Saturday 26 February 2011

David Nash at the Yorkshire Sculpture Park

Yesterday we actually managed to have a family day out together - quite a rare occurrence!  So, only an hour later than planned (due to oversleeping teenagers, and the forgetting of cameras) we set off to see the David Nash exhibition at the Yorkshire Sculpture Park.  This has been the largest exhibition of his work ever and there was so much to see.  The larger pieces were amazing, monumental, but there were plenty of smaller pieces to see as well.  Wood is such a beautiful material and he manages to bring out its character so well.  Particularly moving were the pieces he made in response to the 911 twin towers disaster.

The exhibition closes tomorrow, but if you do get the chance to see some of his work, do go!


The weather was quite kind to us - it was grey but not too cold and it didn't rain - and there was time for a quick game of pooh-sticks on the way back through the park!


The motorways were a bit congested on the way back due to a crash on the M56 so we stopped of at the Trafford Centre for a bit of a nose around and a very nice tapas meal. Which was great compensation for those of us who were less keen on the art... so a great day out was had by all!

Thursday 24 February 2011

A Rainy Day in London

Yesterday I took a day trip to London with my eldest son and it rained on us.  We went to see the Anish Kapoor exhibit 'Turning the World Upside down' in Kensington Gardens.  The mirrors were spectacular even in the rain - we'd love to go back and see them on a better day though.

Turning the world upside down

Turning the world upside down

We went to the Saatchi Gallery too. Particular favourites of ours were Swarm by Tessa Farmer - amazingly detailed and slightly eerie tiny tiny skeletal figures riding on the backs of insects.   And 20:50 by Richard Wilson.  He has flooded the basement with recycled sump oil - when you walk in it takes a moment - at least! - to realise what you are looking at.  The effect is just amazing, very peaceful but perhaps slightly sinister with the faint smell of oil... this is a permanent exhibit and it's well worth the trip just to see that.

I didn't take any pictures inside but I did take these lovely shots outside of trees reflected on the beautiful stone slabs.  I wouldn't have got these without the rain!


We did a bit of shopping, and a lot of walking, and today we are back home again, rather footsore to say the least!

Tuesday 22 February 2011

Experiments with Basket Weaving

I belong to a lovely textile art group - we meet once a month and have workshops from visiting tutors and try out all sorts of different techniques.  At the last session we looked at different traditional basket making techniques.  We were shown how to make simple woven baskets from paper - I had a go at home with strips cut from a paper carrier bag.  It was a bit fiddly but I was chuffed when I finally got them to hold together!


I have long admired the little baskets made by SewDanish on Etsy - I am even more in awe now I know how fiddly they are - hers are so much neater than mine!  I think I need more practise.  A lot more practise.

Basket by SewDanish
Basket by SewDanish

During the session on Saturday I worked on using a traditional knotting technique - not to make a basket, but to cover a rather nice piece of driftwood I had in my bag.  And of course I had to add a few of my favourite shells...  I really enjoyed this, it was a very calming process and I'm pleased with the result.  Makes a nice sound when you shake it too!


The coloured thread is all waxed linen thread.  It is a bit strange and sticky to work with but makes really satisfying knots, and I love the subdued colours.  There is a bit of a problem with this stuff though; it is apparently made in Northern Ireland - it says 'Crawfords Belfast' as clear as anything on the label - and yet it seems you can only buy it in the US.  It's not cheap and by the time you've added on shipping, VAT and the good old Royal Mail handling fee it's going to be exorbitant.  So if anyone knows where you can get it this side of the pond do please please let me know.

Monday 21 February 2011

Jewellery - Metalwork

The last stop on our trip round the departments was the Jewellery-Metalwork department.  Our brief for these 2 weeks was to create a ring.  I had great fun here - I had really been looking forward to having the chance to mix some of my favourite textiley fibres with some metal - and ended up making several ring-like things!

First off I loosely needlefelted some bits of fluff together - a mixture of wool and silk and linen fibres - and textured a little piece of copper to sit on top of them.  Now obviously I couldn't do any soldering with this little lot around without them going up in flames so I made the ring separately and then riveted the fluff and metal onto it.  A bit fiddly, to say the least!


Next I got out one of my very favourite fibres.  This is beaten kozo fibre, I think it is from the bark of the mulberry tree, and it has been prepared for papermaking.  It comes as funny little sticks but if you soak them you can gently tease them out into the most amazing lacy structures, which are quite stiff once they dry.  It can be a bit hit-and-miss if you want a particular size and shape, you never really know what you're going to get, but it's always beautiful.  I threaded my kozo pieces onto wire which had been soldered onto a ring to create this lovely pod shape.  This is definitely my favourite!


Ring 1


I do need to find a neater way to finish the wires together at the top though - again, soldering is out - maybe I just need to practice my wire-wrapping!

Having made these 'proper' rings I went on to have fun experimenting with my favourite combination of silk paper and wire.  I already use these materials to create the hearts I sell in my hypsela handmade shop but I had never managed to form the silk paper over a 3D wire structure without just getting into a sticky mess.  I twisted some wire into loose spirals to fit over my fingers and got out the silk paper... well the first couple of goes were my usual sticky mess, but evetually I discovered if I laid the silk fibres in the same direction as the wire it worked!  (well, sometimes...)

Ring 2


I know, a pretty strange sort of ring but a great discovery for me!  And lastly, another weird and wacky ring-thing made using the same technique...  There's no stopping me now!

Ring 3

Tuesday 15 February 2011

Ceramics

Another long overdue post... this one about the 2 weeks we spent in the Ceramics department just before Christmas (I told you it was overdue!)

We were working with a porcelain based paperclay - paperclay is more forgiving for beginners like us since any air trapped in the clay can find its way out along the paper fibres during firing, rather than expanding and causing the piece to shatter or break in the kiln.

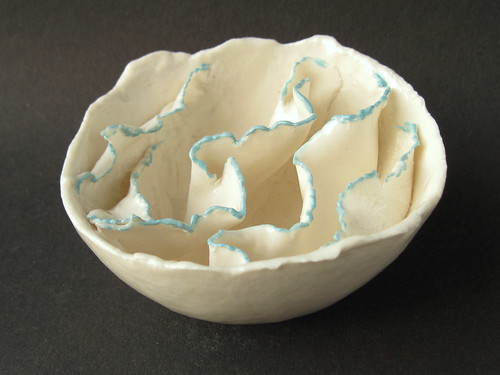
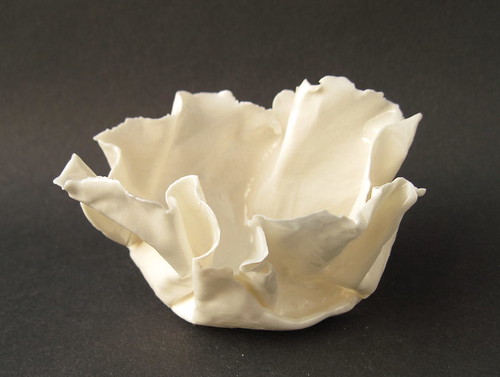
I spent quite a bit of time finding out how thin I could roll the clay - quite thin here...


... but rolling it out between layers of oiled clingfilm means you can get it really very thin!


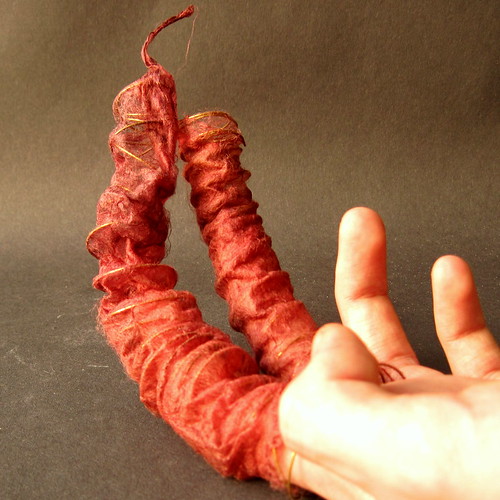
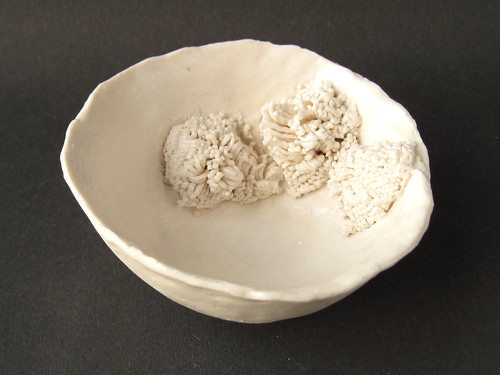
Pushing clay through a sieve gave a really interesting texture, although it was then incredibly difficult to handle without crushing.


These pieces were all glazed with a clear glaze applied in the spray booth.  That was fun... the spray is quite high pressure and some of my pieces were so lightweight it was difficult not to fire them across the room!

We also had a go at raku firing.  The pieces were biscuit fired first in the kiln, then we glazed them with a special raku glaze. For the raku firing we used a small kiln built from fire bricks, lined with ceramic fibre and heated with a gas torch.


The firing takes about 30 minutes.  Once the pieces were glowing orange we removed them from the kiln (using tongs!) and plunged them straight into a bin full of sawdust, throwing in handfuls of extra sawdust to cover them and extinguish any flames - very smoky, this bit - and left them to cool.

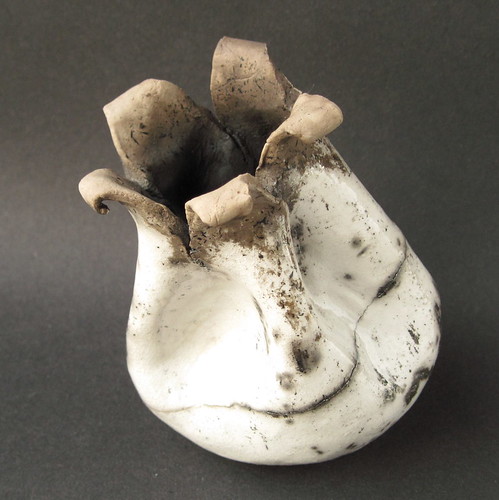
Any areas left unglazed - like the inside of this vessel - are blackened by the raku firing.


Removing the pieces from the kiln while they are so hot puts a tremendous strain on them.  This vessel had a join around the middle which almost cracked under the strain - fortunately it held together and has been left with a rather nice metallic black line along the join.

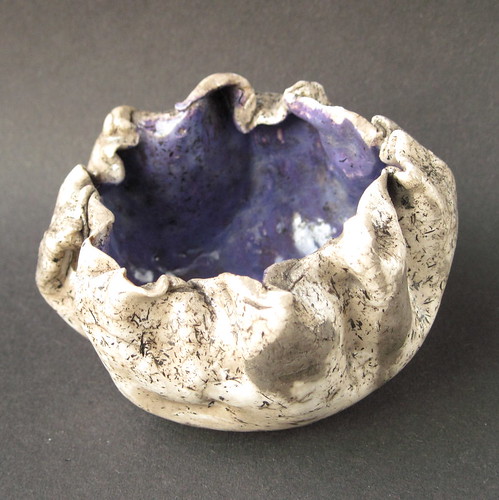
I was a teeny bit more adventurous with the colour on this one, and I do like the way the purple has come out.

LinkWithin

Related Posts with Thumbnails